

Looking to increase website traffic in 2022?
Over the last decade, we’ve had the opportunity to personally work with hundreds of different businesses in various niches and sizes – and we’ve learned the #1 thing that almost every small business struggles with.
It’s usually nothing to do with the actual product or service.
The #1 problem that we see with small businesses is visibility.
If you’re a small business owner reading this, I bet you have amazing products and or services. Heck, your customer service is probably what keeps you afloat.
I know that because I’m confident if I asked you, “Where do you get most of your current customers?” Your answer would be…
Referrals.
That’s great and it proves all of the above to be true. In fact, we would have answered the question the same as you just under a year ago.
However, the problem with referrals is you never know when the next one’s coming. You have little to no control over referrals. While they might even be your best customers, it’s hard to survive when you don’t know when the next one is coming.
What if there was a way to increase your customer base by increasing your visibility?
Wouldn’t you agree that if more people knew about your product or service they would be likely to buy into what you’re offering?
“What can I do to increase traffic to my website?”
I get asked this question a lot.
So much in fact, that I decided to put together this totally deep and comprehensive guide to show you exactly how you can start increasing visibility in your business and start driving more traffic to your website.
The fancy term for the method I am going to share with you is called Content Marketing.
content marketing
… a type of marketing that involves the creation and sharing of online material (such as videos, blogs, and social media posts) that does not explicitly promote a brand, but is intended to stimulate interest in its products or services.
My team and I have condensed ALL of the components to being successful with content marketing into 4 actionable steps that can be continuously repeated to drive more traffic and increase your website’s visibility.
These steps are:
- Step 1 – Create
- Step 2 – Optimize
- Step 3 – Push
- Step 4 – Measure
…and repeat!
Let’s dive into STEP 1
Step 1 – Creating content that drives traffic to your website
SHORT ON TIME?
Download all 4 steps in this complete, easy-to-follow, step-by-step PDF guide!
Before you jump in and start creating killer content, you need to know who you’re writing to. Who is your ideal client? This is a crucial step that is often overlooked.
You don’t want to waste your time writing for an audience that doesn’t care what you have to say.
Here’s an example of what I mean.
While this will appeal to other people in my industry, like other Web designers, they are not my customers or ideal audience. Other web designers are not paying me to design websites.
As a web designer, I’m building websites for businesses. My target audience is going to be business owners, entrepreneurs, and marketers.
The content I create should add value and be relevant to the needs of that target audience.
Knowing my target audience is going to drastically change what I write about and how I write it. If you are going to increase your website traffic you want that traffic to be your target audience!
To reach your target audience you must know:
- Who they are.
- What content will help them?
- How that content will improve their life.
Start by asking yourself the following questions:
Who are my current customers?
If you’ve been in business for a little while, you should be able to see a trend of who your current customer is. This will give you a great starting point to identifying your customer’s demographics.
What industry are they in? What is their job title? What’s the typical age group of my customers? What are they interested in? Where do they hang out online or in real life?
By thinking about these questions, you can start to put together pieces of the puzzle with to discover who your ideal customer or niche is.
What problem does my product or service solve for them?
Your product or service exists for a reason. What is that reason and who would care about it? Who has the problems that you have the solutions for?
The content you create needs to always revolve around how your product or service can solve their problem, or add value in some way.
Who is my competition and what makes me different?
What do your customers gain by choosing you? Knowing this can give you a competitive advantage and allow for opportunities to highlight these advantages in your content.
Now that you have answered these questions, you should have a better understanding of who you should be writing for.
The next step in defining your target audience is to create a persona for your audience.
The main benefit of doing this is to give you a visualization of your audience. So as you create content, you can refer to this persona and it makes it easier to write directly to that “person.”
An easy way to develop your customer persona is to use this free persona creator from Xtensio: https://xtensio.com/user-persona/
Now that you understand the person you are creating content for, the next piece of the puzzle is knowing what stage of the Buying Lifecycle that individual is at and understanding how to nurture them all the way through.
A lifecycle stage is referred to as “where” the individual is in the buying cycle.
Here is a generic example of a typical Buying Lifecycle:
- Awareness – This is where most people are. They are just being introduced to you or your company for the first time and are becoming aware of the solutions you provide to the problems they have.
- Interest/Consideration – People at this stage are doing their research to solve their problem and possibly considering multiple options. They know of your company, but they’re not ready to pull the trigger just yet. In this stage, they need more information to make their decision.
- Evaluation/Purchase – In this phase they are narrowing down their choices and actively planning to purchase.
- Retention/Upsells – These are the people who have converted into paying customers. This is the group of individuals that are often ignored or underestimated by many businesses. However, it is a well-known fact that it is easier to get someone to buy from you again that it was to get them to buy from you in the first place.
As we start to think of ideas or topics for our content, we want to also consider the persona in relation to the different buying lifecycle stages.
Consider why we would do this.
A person that is just getting introduced to you or your company is going to want to consume content that is very different than someone who is already familiar, done their research, and is ready to buy.
The goal is to create engaging content that targets the right audience in the right lifecycle stage.
Here are some examples of the types of content or information someone would be interested in at different stages of the buying lifecycle.
Content Examples: a Blog post or lead page found in a search, social media interaction, or word of mouth.
Content Examples: Case studies, E-books, webinars, checklists, or other valuable resources.
Content Examples: Testimonials, detailed product/service benefits, demo, or a free trial.
Content Examples: Email marketing, social media direct message marketing, Facebook groups.
Now that you know who your audience is and the different lifecycle stages of a customer, the goal now is to move them along to the next stage of the cycle with great content.
The primary goal is to create niche content that your audience will find valuable.
Why niche?
The more specific your content is, the more likely it is to be found by the right person – your next customer. We’ll talk more about getting found in a little bit.
Why valuable?
If someone finds your content valuable, they are much more likely to share it, engage with you, and continue to do so in the future.
Consistently providing valuable content also leverages you as an expert on the topic and builds trust with your potential customers.
These days successful content marketing is not necessarily about quantity, but more about QUALITY. Having a bunch of mediocre content is not going to necessarily go as far as having truly valuable content that your reader actually receives value from. This is especially true when your audience notices that you out-value the competition.
So, what should you write about? And how do you find relevant topics that your audience will find valuable?
By now you should have a strong idea of hot content ideas for your audience.
ACTION ITEM:
Download this Social Content Strategy Worksheet to discover your main content pillars along with a bunch of correlating topic ideas. It doesn’t matter if they are winners or not, just do a massive brain dump and get them all on paper.
Pay close attention because this section is going to come into play when we talk about optimizing your content later on.
There are two overarching factors to consider:
- Reader Interest– This refers to how many people are actively searching for the topic you are writing about.
- Search Engine Optimization (SEO)– When we are talking about SEO we are talking about the act of the search engines finding your content, ranking it, and displaying it in a list of search results on platforms like Google, Bing and even YouTube. More to come on this.
Why do we need to think about Reader Interest before we develop our content?
Let’s say I sell dog food and I write a great article about, “How packaging suppliers are contaminating dog food.” It’s the perfect article. It’s got all the elements someone would ever want to know on the topic. The title is even ranking first place in all the search engines! I sit back and wait for the traffic to start coming in and… crickets.
No one is reading my article. Why? Because no one is actively searching for this topic on the search engines. While this information is certainly relevant to ALL dog owners, it does my business no service if no one is thinking about this topic or searching it.
No matter how great your SEO is, if no one is searching for your topic then no one will ever read it.
What to do BEFORE developing your content:
Verify that the topic is relevant to your audience and one of your brand pillars. (More on brand pillars in the Social Content Strategy download.)
Research the search volume of the topic to make sure it’s being actively searched. To do this there are a few tools that will tell us the relevance and search volume of a topic.
- Google’s Keyword Planner tool. In this tool, you can put in keyword phrases and it will tell you how many searches that keyword has. For example, I could put in “Dog Food Contamination” and see how many times that phrase is searched. If it doesn’t have a high search volume, then I might consider writing about a different topic.
- A similar tool is Keywords Everywhere. This is a chrome extension that you can install in your chrome browser and when you go to Google and type in a search phrase, it will show you the search volume.
The key here is to develop content around topics that your audience is searching for.
There are a ton of ways that you can leverage your website and blog to provide your audience with valuable content that they will share and keep coming back for.
Here are some different types of content formats that you can incorporate into your posts:
*PROTIP: If you are posting about someone else’s event, let them know! Email them a link to your post and they will likely give you shout out and hopefully share your link with their audience. Driving even more traffic to your site and increasing your visibility.
*PROTIP: When linking to anything outside of your site, be sure that the link opens in a new window so they don’t wander off.
Typically, podcasts are done in series of scheduled episodes. So, there are some considerations and planning to be done before you start.
Your podcast needs to be related to your industry. The topics can stray away from your core services but should always be related to your industry and valuable to the needs of your audience.
The format of your podcast is up to you. They can just be you discussing a topic or an interview-style with like-minded individuals.
You will want to research the technical aspects of how you will create your podcast, and also decide if they will be video podcasts or audio. Once you have your podcast up and running you will want to post them on your website for greater reach and control over you re-caps and show notes.
If you are doing video podcast I recommend that you use YouTube to host the videos and then you can easily embed the videos on your website.
We always recommend putting your videos on YouTube, and then embedding them into your site. YouTube is the 2nd largest search engine and is a subsidiary of the largest search engine, Google.
Here are some different ideas for your videos:
- Sequential videos like How-to’s or Tips
- Or anything you would blog about, but with the engagement and entertainment factor of a video.
If you are really serious about taking your YouTube channel to the next level, we highly recommend checking out Sunny Lenarduzzi’s YouTube For Bosses. She’s the expert when it comes to generating traffic to your business using YouTube.
Your content needs to reside on your website – either as a lead page (also referred to as a landing page) or your blog.
Think of your website as your online hub. The main objective is to get people to your website and this is why your content needs to live there.
I know we’ve talked about content ideas like webinars, e-books, lists, videos and more, but all of these things can be part of your website, the place that you have specially designed to win them over as a customer.
Yes, upload your videos or podcasts to your subscriber platform, but also embed them in a blog post and write cliff notes or give bonus info. Yes, host a webinar or write an e-book, but use a lead page on your website to promote or sign up for it. Does this all make sense?
Nothing can replace your website when it comes to turning content into sales.
Creating killer content starts with a killer title or headline. A bad headline is a sure way to have your content marketing fail. According to Copyblogger, 80% of your visitors will read your headline – but only 20% will go on to finish the article.
The purpose of your headline is to get people to read the first sentence of your article. Your headline should grab the reader’s attention so they focus in on your content. It’s important that the headline directly correlates with the content of the post.
While grabbing the reader’s attention, your headline should also convey a call-to-action, or a reason they should advert their focus to an offer.
Neil Patel uses the “4 U’s” method when writing his headlines.
The four U’s being:
- Make it Unique
- Be Ultra-specific
- Convey a sense of Urgency
- Make it Useful
Sumo.com has put together 51 Headline Formulas. You can bookmark this page and use these as a great starting point for your content.
According to Ray Edwards, author of How To Write Copy That Sells,” a headline must accomplish these 3 tasks:
- Stop the reader in their tracks.
- Make a promise that interests the reader.
- Evoke curiosity.
- Know your audience! You need to have a very clear understanding of who your audience is, their pain point, and what content will position you as the best resource.
- Understand your customer’s buying life cycle stages. Create content that speaks to and delivers value to your potential customer at the various stages they are in. Remember, it’s all about
- Define topics that will engage your audience and promise a transformation that adds value to their life.
- Do your research and make sure that the topics you choose are something that people are actually searching for.
- Spend time crafting a headline that will grab the reader’s attention and make them want to read more.
Now that we’ve covered the Create step of this process let’s move on to Step 2: Optimize.
SHORT ON TIME?
Download all 4 steps in this complete, easy-to-follow, step-by-step PDF guide!
Assuming you’ve already dived into Part One and have a grasp on how to create great content, we’ll need to shift our focus now onto making sure that people can actually find your content organically on search engines!
In this step, we are going to be talking about what to do to make your blog posts rank higher in the search engines.
In a nutshell, search engines have “robots” that go out and scan the Web for Web pages. When the robots come to your site, they start “indexing” your pages. Basically, they are taking a snapshot of each of your pages and looking at different factors.
Their primary goal is to figure out what each page is about and what it is related to. Once they have scanned the page and made their conclusion, they index your page in their database. Now, when someone does a search, the search engine goes into the database and returns what they think is the most relevant pages for that search phrase.
The pages are listed in order of what the search engine has determined is the most relevant content to the user. This is referred to as “SERP”, Search Engine Results Page.
Your goal is to get higher in the SERP by making it easier for the search engines to know what your page is about and how relevant it is to a topic.
In time, the robots will come back and look for changes to your pages and re-index them.
There are a few steps we need to focus on first.
- Step 1: We need to tell the search engine robots that your pages exist and guide them through what pages we want them to index.
- Step 2: We need to make sure that we have optimized your post so that the search engines know what your pages are about.
The plugin that we recommend to accomplish this on your WordPress website is the Yoast SEO plugin.
To install this plugin, follow the simple steps below:
- You will want login to your website and go to “Plugins”
- Click “Add New”
- Then search for Yoast SEO
- Click install, and then activate.
Setting up the Yoast SEO Plugin.
Now that you have the plugin installed we are going to walk through setting up the Yoast SEO plugin.
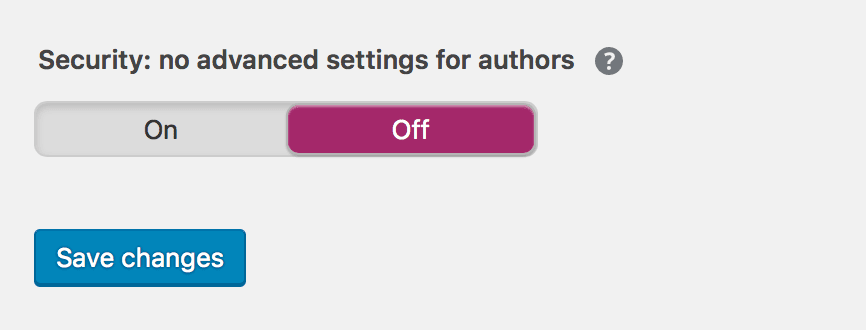
In the admin panel, navigate to the SEO tab on the left and click on General. Then select the Features tab at the top.
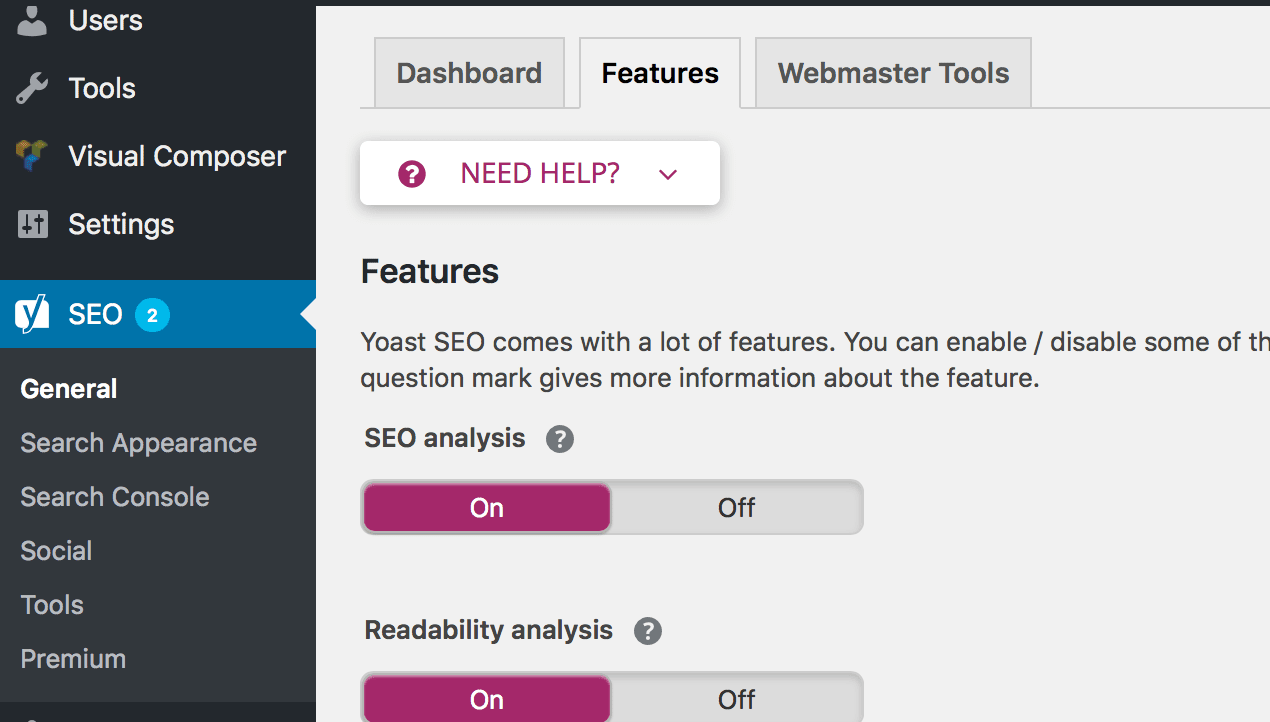
Keep all of the setting set to On except the very last one named Security: no advanced settings for authors.
Then click Save Changes.
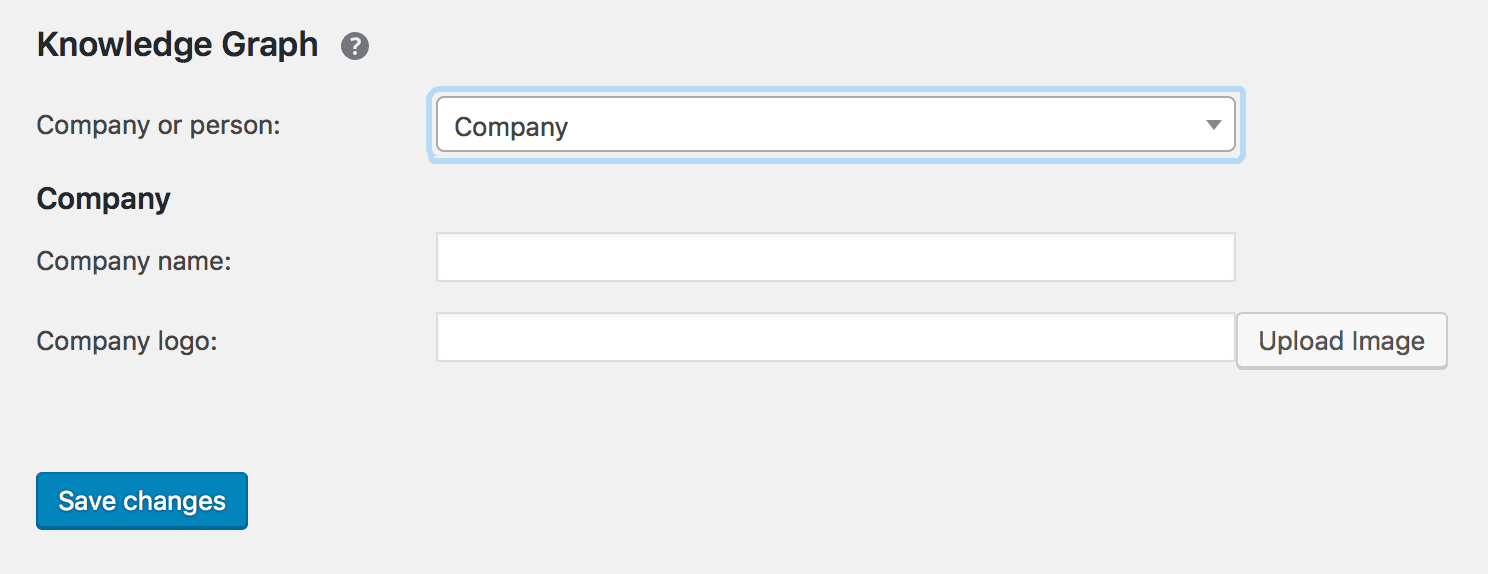
Next, go to Search Appearance in the admin panel under SEO.
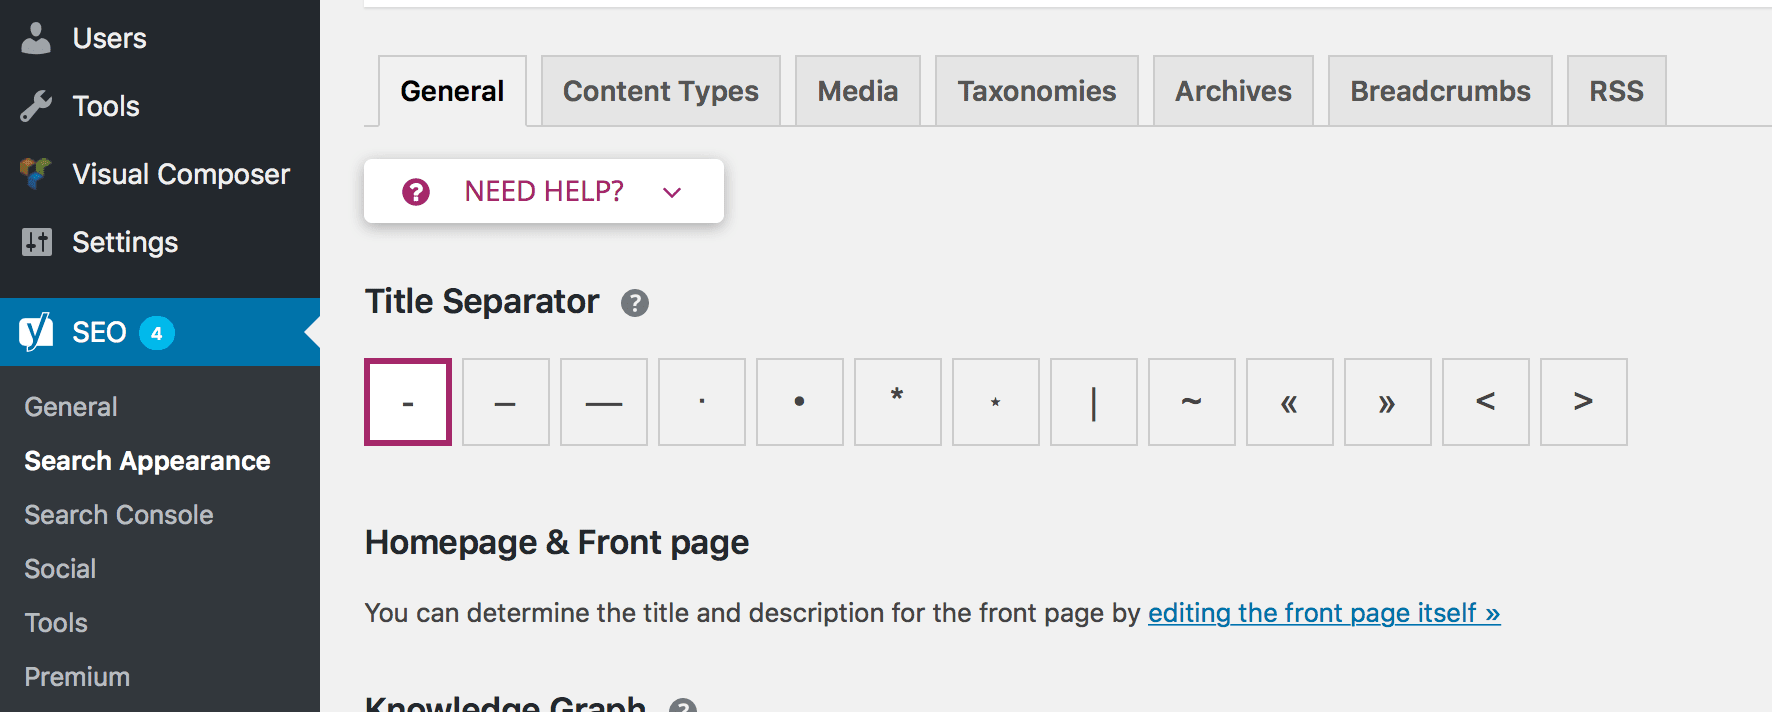
In the General tab, select whether you are a company or a person, fill out the fields below, and upload your logo.
Then click Save Changes.
Next, select the Content Types tab. This is where we are going to tell the search engines what to index and what to ignore. There are some things in your WordPress website we don’t want the search engines to index.
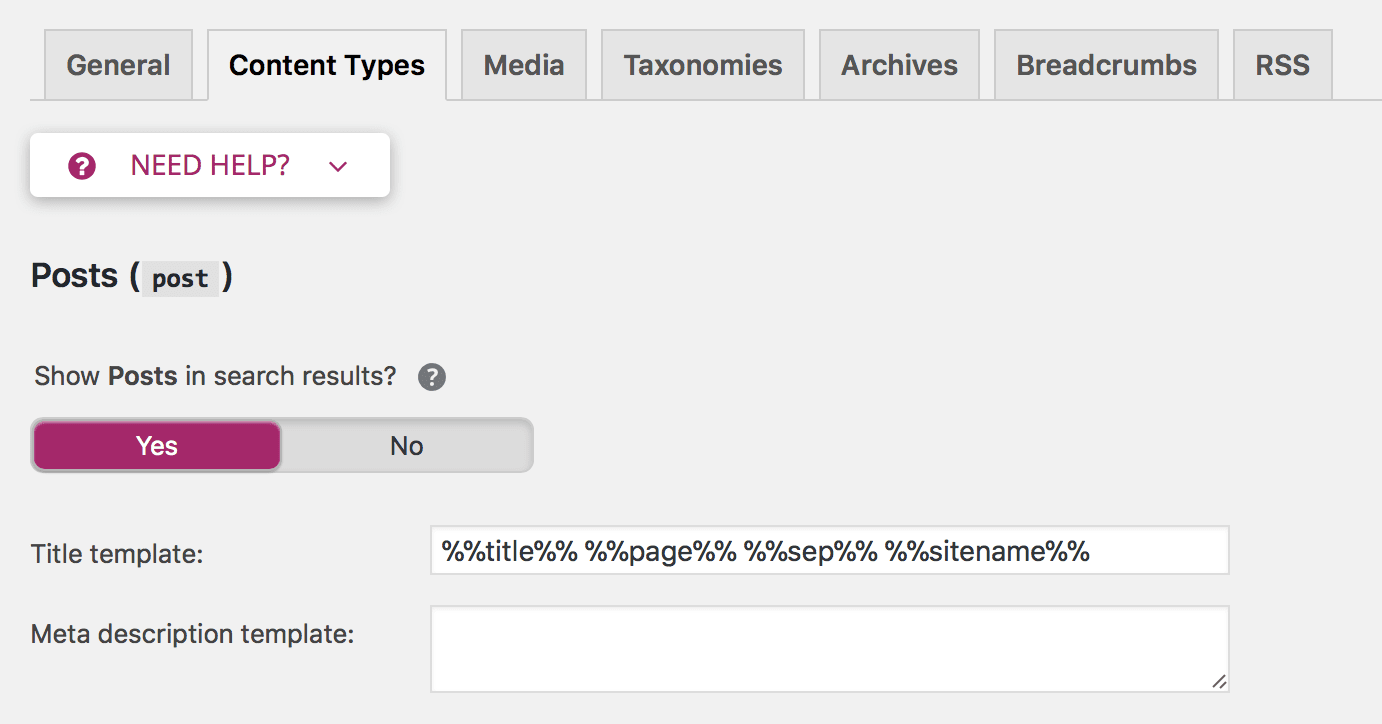
In this screen, you are going to see the different content types that are available on your site. Each site is different because different WordPress themes and plugins come with different content types.
We are going to turn off all the content types that don’t make sense for the search engines to index. For example, Sliders will not be a content type you see, we don’t want the search engines indexing each of your sliders. Instead, we want the search engine to index the page that the slider is on.
To be safe, we are going to turn everything off except for Pages and Posts.
To do this we are going to go down the list and set all the purple toggles to No; EXCEPT for Page and Post, leave those set to Yes.
Then click Save Changes.
Next, on that same page, we are going to go to the Taxonomies tab (skipping the Media tab because there are no required changes there).
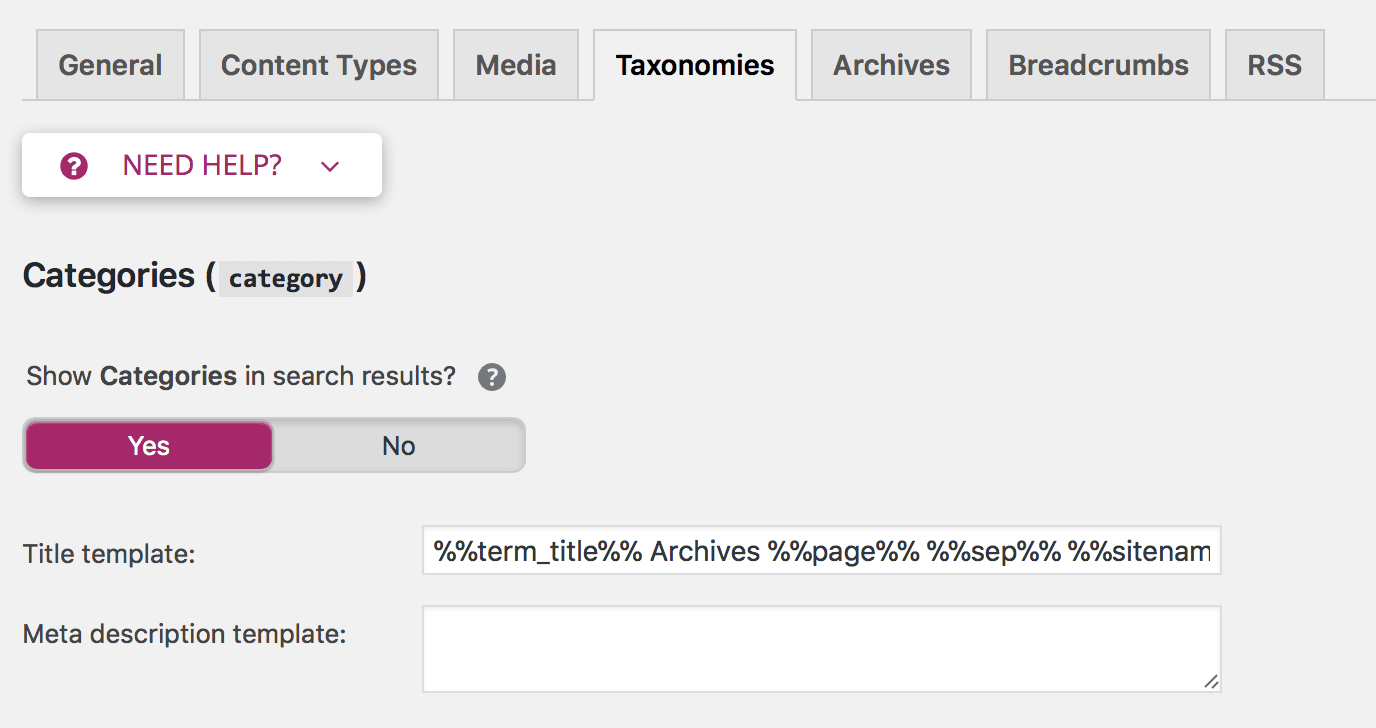
In this tab, we are going to do the same exact thing as we did in the previous tab. We are going to turn all the Yes and No toggles to No; EXCEPT for the Categories, which we will leave set to Yes.
Then click Save Changes.
Next, we are going to go to the Archives tab. This tab will allow us to set the Author and Date settings.
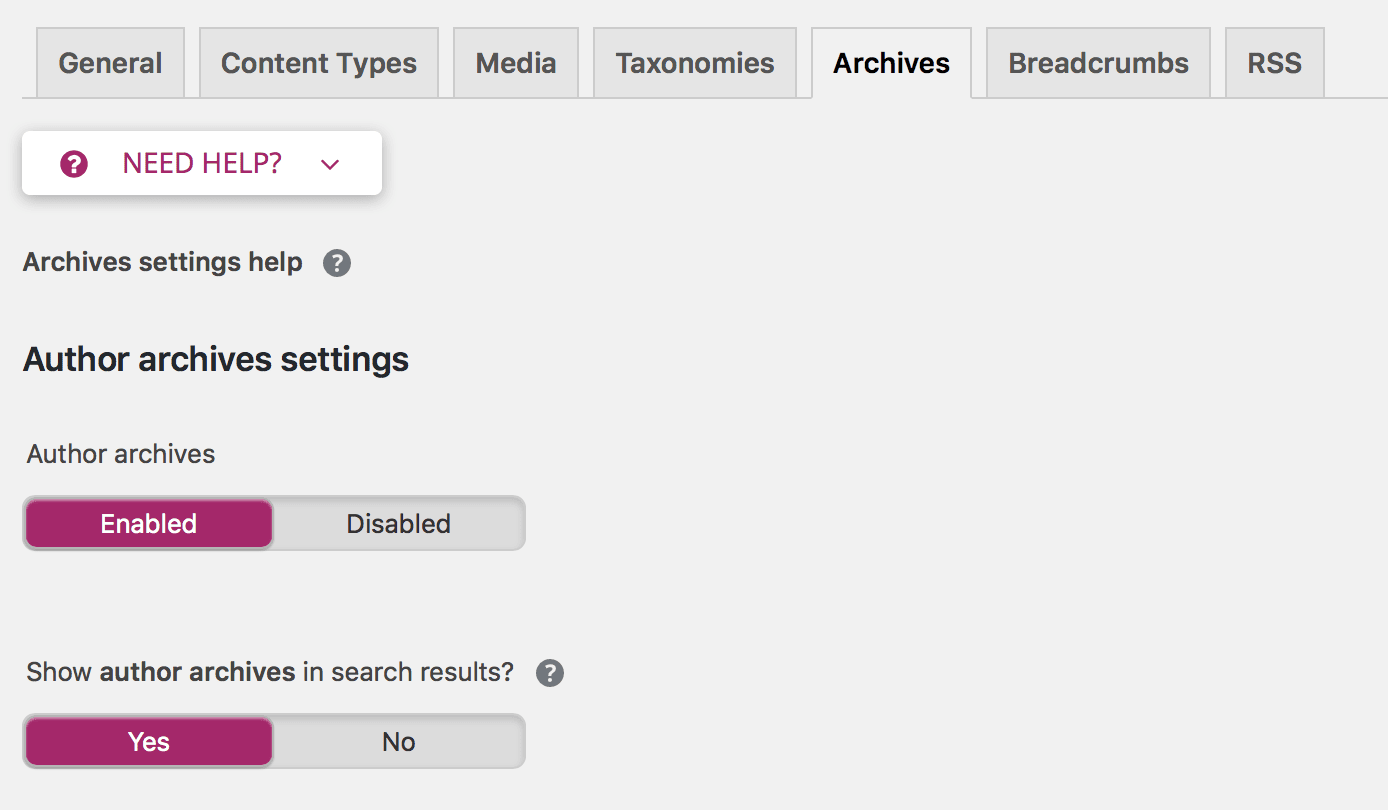
In this tab, we are going to Disable the Author Archives, unless you have multiple authors contributing to your blog.
Below that is the Date archives. We are going to disable the Date archives.
The reason we are disabling these options is to reduce the amount of duplicate content. Google does not like duplicate content, and when these are turned on, it creates duplicate content. Say it one more time with me…What does Google dislike? Duplicate content!
Then click Save Changes.
Next, we are going to navigate to the Social settings under SEO. Here you are just going to put in the links to your social platforms that you use.
Then click Save Changes.

Submitting a sitemap to Google.
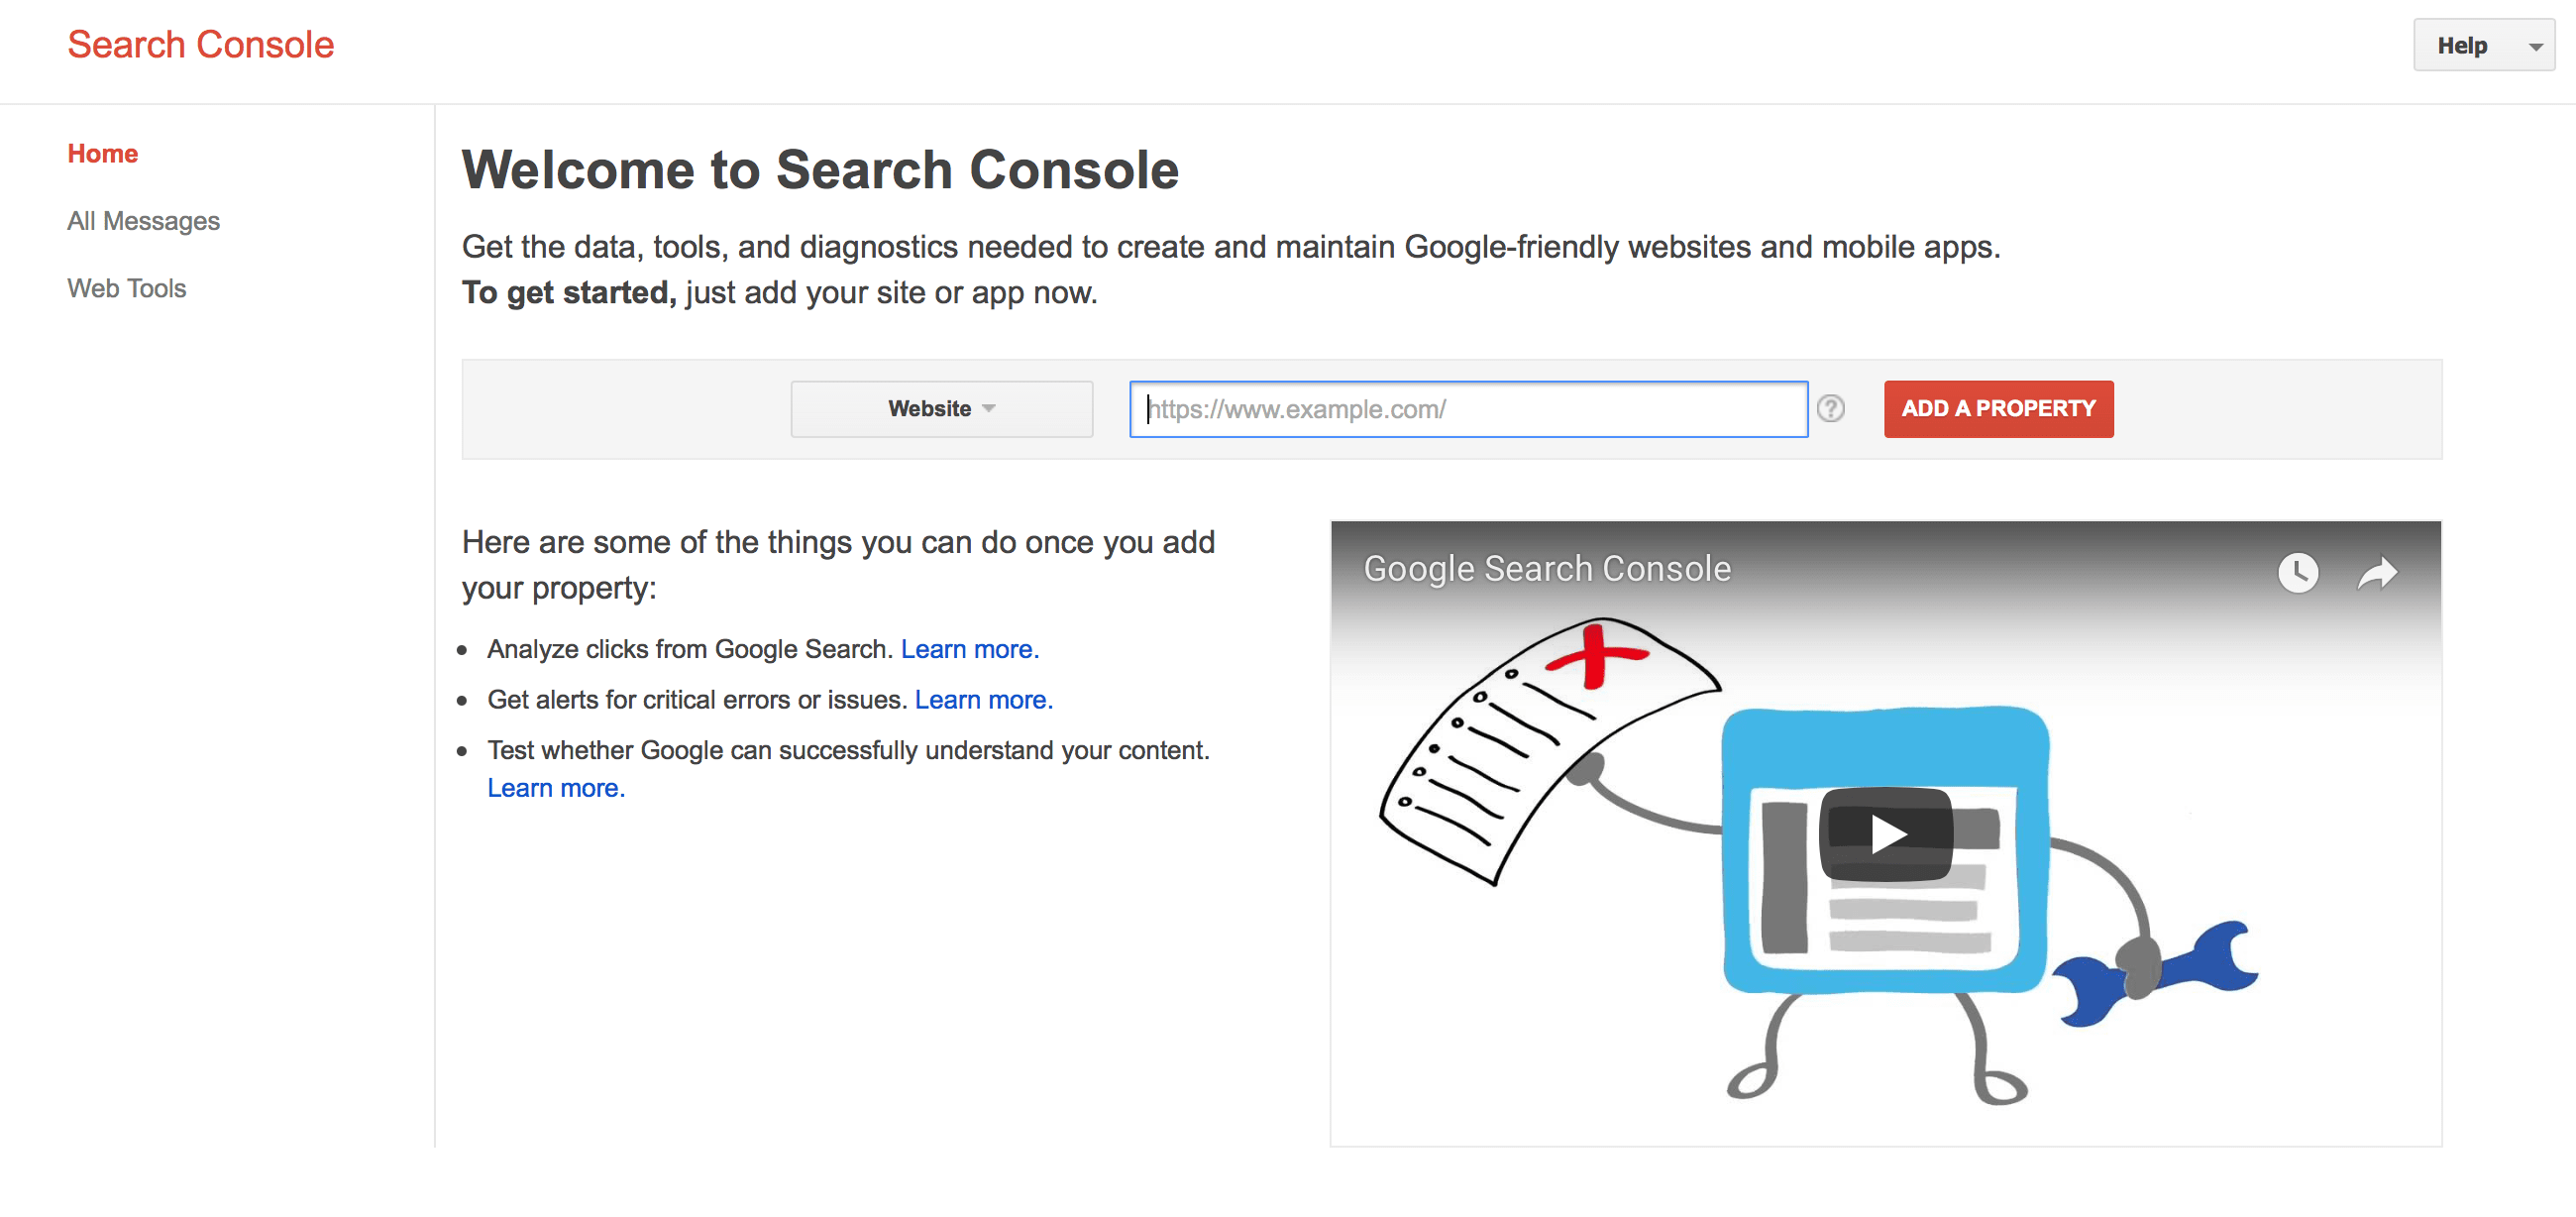
Now we are going to submit your Sitemap to Google. A sitemap is a document that tells the search engines what to index, and it gets uploaded to your Google Webmaster Tools account.
The first thing we’ll need to do is create a Google Webmasters Tools account. To do this click on this link: https://www.google.com/webmasters/
You will need to sign in with a Google account if you don’t have one you can simply create a new account. Just remember to save the email address and password you used to create the account for later.
Once your account is created and you are logged in, it’s going to ask you for your domain name.
Enter your full domain name and play close attention to the http or https because it makes a difference.
If you go to your website and it runs under https then be sure to use that. You’ll know by looking in the address bar in your browser or if there is a lock in the address bar of your browser when you navigate to your website.
Next, we need to verify your account.
Click on the Alternate Methods tab and select HTML Tag.

You will be shown an HTML Tag that you will need to copy.

With the tag copied, go back to your website admin panel and navigate to the General setting under SEO. In the General setting go to the Webmasters Tool and paste the HTML code into the Google verification code: text field.
Then click Save Changes.

Now go back to the Webmasters Tool and click Verify. You should receive a success message.
Now that the site is verified we are going to upload the sitemap from your site to your new Google property.
To do this we are going to need to get the URL of your sitemap. The Yoast SEO plugin automatically creates it for you based on your previous selections. You can find it by opening your website in a browser and adding /sitemap_index.xml to the end of your URL. For example: www.your-domain.com/sitemap_index.xml
Now go back to Webmaster Tools and click on Sitemaps.

This will open up the sitemap screen.
Now click on the Add a Sitemap button and paste in the URL part that you just copied.
That’s it! We are done with the sitemap and Webmaster Tools!
Optimizing individual pages and posts.
All of the basic settings are set for your SEO plugin, the Webmasters Tools are set up, and your Sitemap is uploaded. Do you feel accomplished or what?!
The next step is to go into the main pages of your website and start optimizing them for the proper search phrases.
To do this we are going to start with the homepage.
Go to Pages in the admin navigation and click Edit on the Home Page.
Then scroll down until you see the Yoast SEO box.

This is where we are going to set the meta tags for the title and description. These are the 2 elements that Google displays in their search results.
The title is the blue bold headline, and the description is the paragraph text that you see in Google’s search results.
The goal here is to naturally add the topical keywords into these two areas.
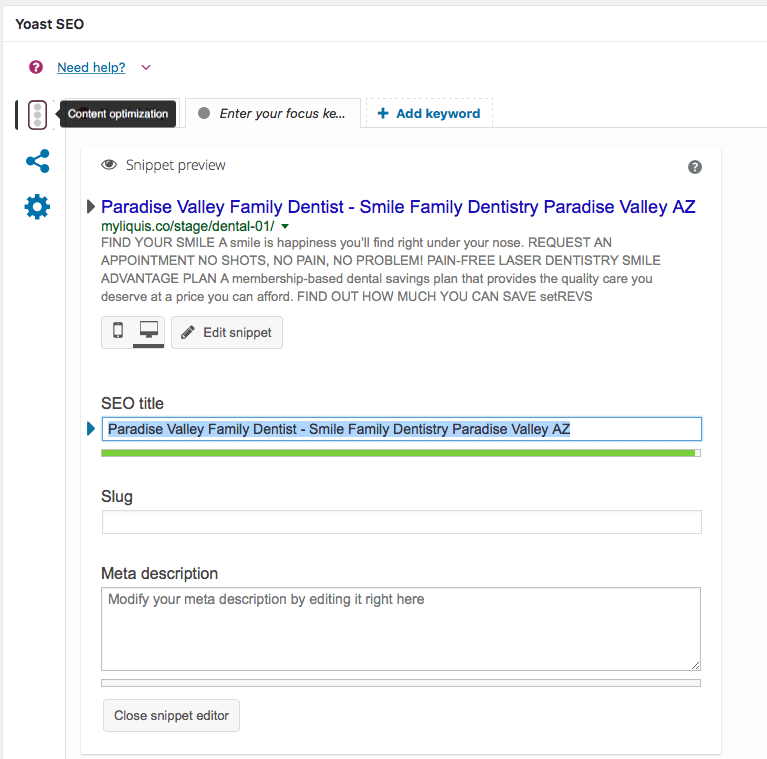
In this example, the site belongs to a dentist office in Paradise Valley, AZ.
Because this is a location-based business, we are going to start with the main keyword phrase Paradise Valley Family Dentist.
To apply the keyword, click the gray arrow next to the title snippet to expand the snippet editor.
We are going to start creating our title and description. We want to add our main keyword first in the SEO title text field and see how many characters we have left to use.
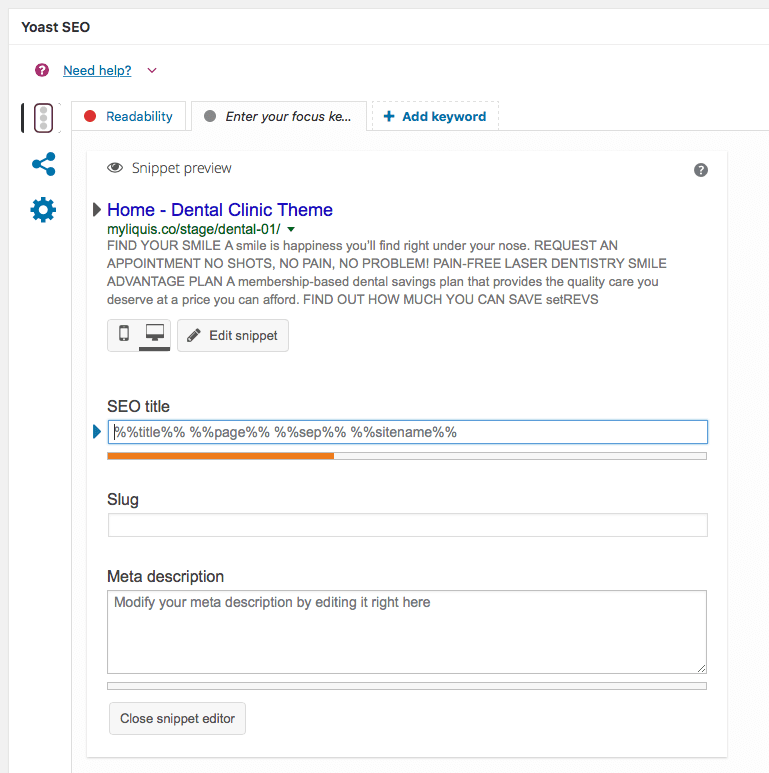
The goal is to turn the orange indicator bar to green. If we enter too many characters, it will turn red and we don’t want that. Google will only display up to 60 characters.
So, in this example, I did something like this… Let’s also assume the dentistry name is Smile.
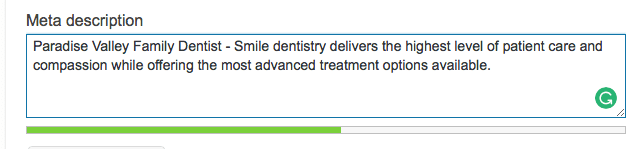
Now I’m going to do the same thing for the description by putting the keyword at the beginning of the description and then filling in the rest.
The description text is the verbiage people are going to read when deciding to click on your search result. You want your keyword in there but more importantly, you want it to read as naturally as possible and also be enticing for people to click on.
Here is an example of a good description.
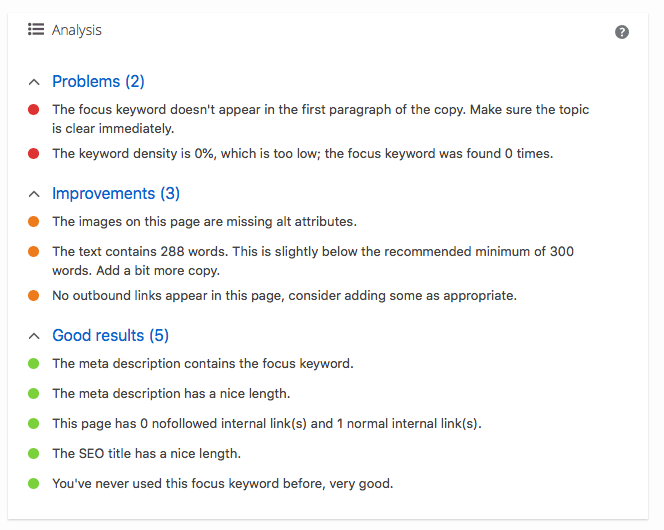
Below the Description text box, there is the Focused Keyword box. This is a tool you can use to see how well your page is optimized for that particular keyword. Once you put your keyword phrase in and update the page it will give you feedback on things to improve and tell you how well the on-site SEO factors are set up.
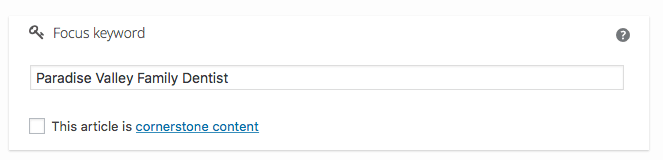
Don’t stress out if the result indicator does not turn green. Just think of this as a single tool in the toolbox to help you improve your on-site SEO.
Spending extra time trying to get the indicator green will not necessarily mean you are going to improve your rankings dramatically.
Once you refresh your page, you’ll see the indicator that I’m talking about.
In this case, we did end up getting the indicator to turn green, but that does not always happen.

Once you’ve completed this step you can scroll down to find an analysis.
This is where the plugin will give you suggestions on how you can improve your page’s on-site SEO.
Now you can go on to complete this same step on all of your main website pages and more importantly your blog posts and lead pages. As you create new blog posts or pages, make it a habit to complete this step when you publish it.
That is the main setup and how to use the Yoast SEO plugin and will be 95% of what you do to optimize your pages & posts.
Additional SEO Considerations.
There are a few more items that you are going to want to pay attention to as you create new blog posts or lead pages on your WordPress website.
Images – We know images are important to add to your blog post because it entices the reader and helps breaks up the content so that it easier to consume. As you add images, you should consider the size of the image and also adding keywords to the image metadata.
Google looks at page loading speed when deciding which results to show, so optimizing the size of your images before you add them to your post is going to go along way.
If you want to check your sites loading speed, you can use these free online tools:
Google Page loading Speed Tester – https://developers.google.com/speed/pagespeed/insights/
Pingdom – https://tools.pingdom.com
Also, here is a video I put together on How to optimize your images without losing quality that provides some quick tips.

You can enter your keywords into these fields to help Google better understand the context of your content that they are accompanying.
The key thing to note here is you only want one H1 tag on your blog post or landing page. Google looks at the heading tags to get an idea of what your content is about and the topic of your page or post. It looks at the heading tags in a hierarchy to determine importance. So, your H1 tag is your most important and it would be wise to have your keyword in the H1 heading.
As you create your page or post, you can control the headings by using the drop-down in the top left of the content editor.
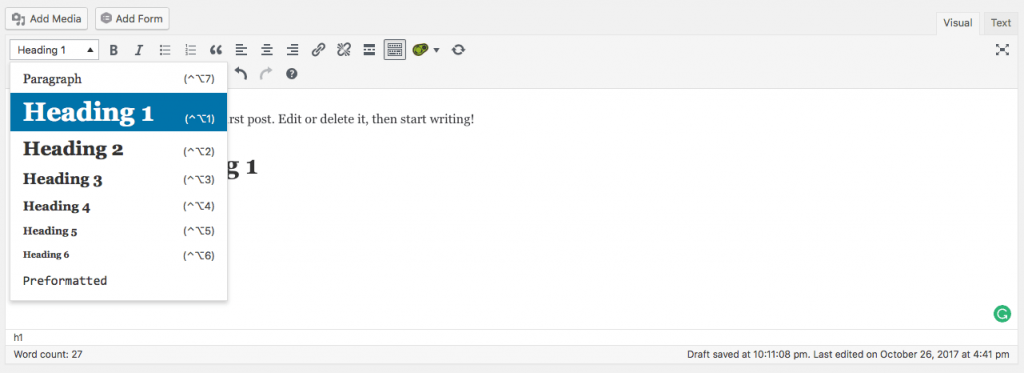
One thing to be cautious of is some WordPress themes will automatically add your post’s title as an H1 heading on your blog post. So if you go and add an H1 heading yourself, then you would now have two H1 headings… And you don’t want that.
You can do a check to see if your theme is automatically adding an H1 heading to your post by using this free heading checker tool: https://www.seoreviewtools.com/html-headings-checker/
So that wraps our section on SEO. Now that we know how to optimize our posts to be found organically on the search engines, let’s discuss how we can use other channels to get more visibility to our blog posts.
SHORT ON TIME?
Download all 4 steps in this complete, easy-to-follow, step-by-step PDF guide!
By now you have great content and have optimized it to be found organically on search engines… Congrats!
But let’s not stop there. You can take advantage of many different platforms and tools to help your content gain more visibility. In this step, we are going to talk about how you can push out your content to your new potential customers. Below you will find different ideas on how to do just that.
Step 3 – Push out your content for the world to see
Social Media
This is so obvious it may even seem silly to include it. However, we continuously see people missing opportunities in this area. So, we are going to highlight the main platforms and discuss some different ideas you can use on each of them. One important thing to note about using these social media platforms is that you don’t want to only post your blog posts or offers. This is a recipe for a board or annoyed audience that will eventually tune you out. Make sure you’re sharing other valuable content, being personable, and interacting with other people or brands in between self-promotion.
Go Live
Many social platforms allow you to take a live video. This a great way to let people know about your new content. As of right now, social platforms are really pushing live videos for organic reach, so that means your video is likely to get much higher visibility then just posting a link. In your live video you would want to briefly discuss the topic, like a teaser, and then direct them to view more with a link to your webpage in the post description.
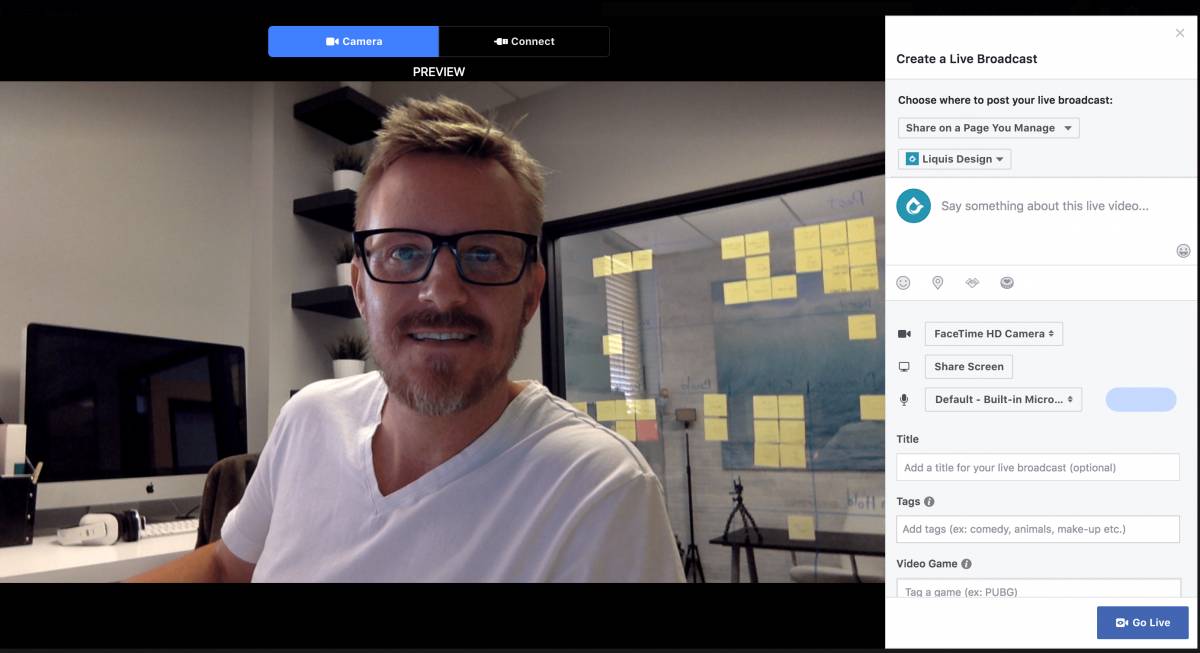
Some of the recommended platforms you can go live on: Facebook, Instagram, YouTube.
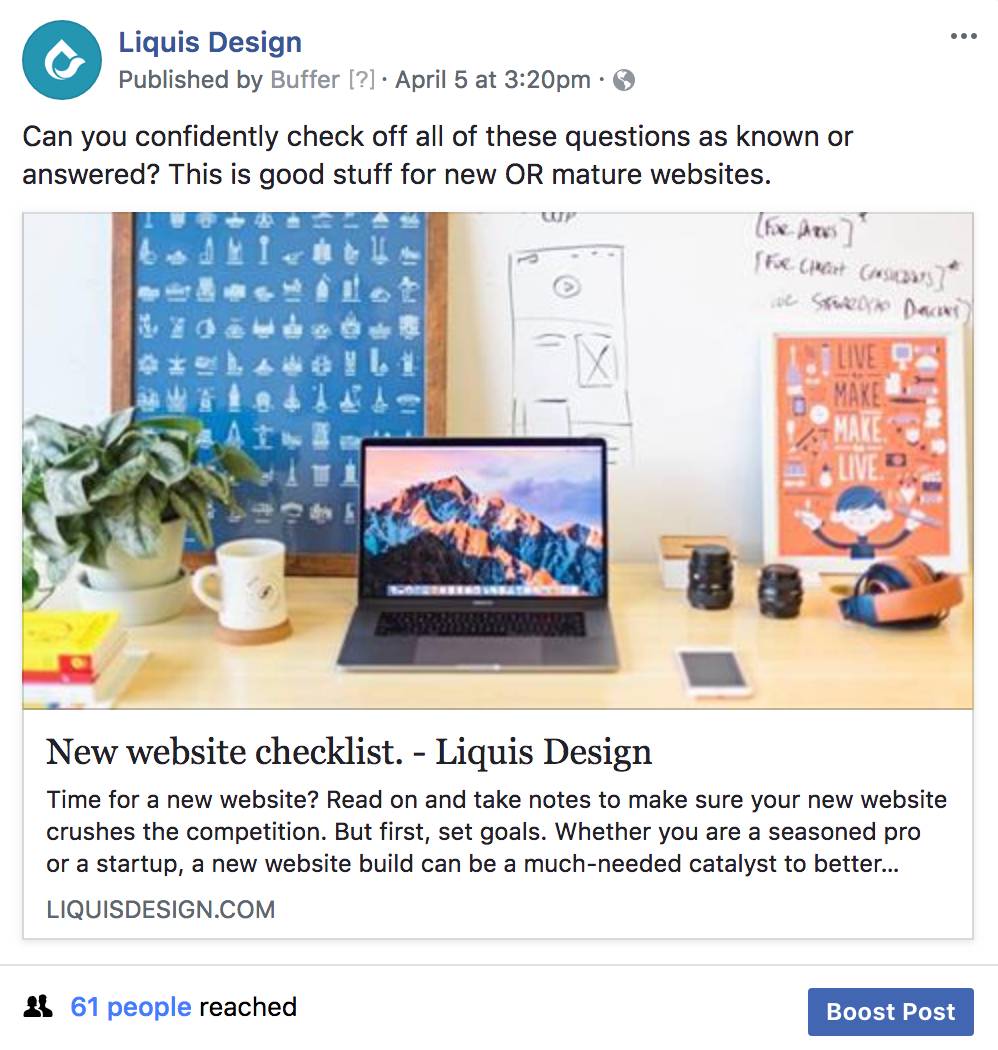
Facebook Ads
Running a Facebook ad is a great way to expand your reach and gain more visibility to a very targeted audience. One of the easiest ways to get started in this area is to create a Facebook post that links to your webpage, like mentioned above, and then “boost” your post. You will see an option to boost your post once it’s published. Just click on the blue Boost Post button.
There are more advanced ways to run Facebook ads, but if you’re just getting started and looking to expand your reach, then this is an easy way to get more exposure for your content.
Forums and Groups
Forums and groups are a great place to gain visibility. You will want to use groups and forums a little differently though. Basically, what you’re looking for are people asking the questions that your blog post can answer. So, while you’re searching through these forums and groups you want to find individuals whom you can help by sharing your blog post. If you just go into these groups and start posting links to your blog post, then you will come off spammy and no one will really trust what you have to say. It’s better to help than self-promote and people can tell the difference.
Engage in the conversation and offer helpful information in your response and then provide a link to your post, where they can learn more. You will want to be careful not to break the group or forum rules. Some will not allow you to post links to your blog posts.
Recommended places to find relevant groups: Facebook, LinkedIn, Industry Forums, Quora, Alignable.
Once you get familiar with how groups operate, try becoming a group admin yourself! A great resource to do this the right ways is the Social Boss herself, Caitlin Bacher.
Email Newsletters
Sending out email newsletters to your subscribers is a great way to keep in touch with your audience, and what better place to add a link to your latest content. In order to send out these newsletters, you’ll need a newsletter system that can allow people to subscribe to a list and also allow you to send them emails.
We recommend using MailChimp for this. It’s free up to 200 subscribers and 12,000 emails per month. They provide all the tools you’d need to collect subscribers on your website and send out newsletters.
More tools to push your content.
There are many tools to help with posting to social media, and getting your content shared.
Below are a few that we recommend.
- MailChimp– The perfect email Marketing system for beginners to advanced users with customizable templates and automation.
- Buffer– This social media scheduler allows you to connect your different social media accounts, and then queue up multiple posts to be automatically published to all your accounts, all from one app. This one is a big time saver. Plus, they give some basic stats to help you see what content is performing best.
- Sumo– Sumo offers many tools, but the one I want to talk about is their share buttons. Adding share buttons to your blog posts or lead pages allows your readers to share your content themselves or on their social accounts. Sumo is one of the leaders when it comes to these types of tools. Adding Sumo share buttons to your blog posts will surely help increase your post visibility.
- Pablo– Pablo, owned by Buffer, is a free image creator. It allows you to select from thousands of free stock photos and overlay and/or your logo. They even have image size selections for the different social media platforms. This is a great resource to create images that support your content.
- Canva– Similar to Pablo, but more robust. Canva allows you to create images for social media and also for your blog posts, YouTube clip art, Infographics, social banners, ads, etc. Here is a video that explains the difference between Pablo vs. Canva: https://youtu.be/1in8_MkDWYE
- The Pexels– This is simply a free stock photo site. They have a nice library of great images to choose from.
- Click To Tweet– Click To Tweet is a WordPress plugin that allows you to craft a tweet box and insert it into your blog post. As your audience is reading through your content, they are presented with an opportunity to share your web page on Twitter with a snippet of content that YOU created. All the reader has to do is click the “Tweet This” button and the tweet is sent through their own twitter account. This is a slick tool for increasing your web page visibility.
SHORT ON TIME?
Download all 4 steps in this complete, easy-to-follow, step-by-step PDF guide!
Step 4 – Measure your results with Google Analytics
So, you have now published great content, optimized it for organic reach, and have been pushing it out to your audience. What could be next?
Find out what’s working – and what’s not.
In this step, we are going to be talking about measuring the effectiveness of your efforts. Content Marketing can be a bit of trial and error and knowing what is working will help you put your energy in the right places.
Remember back in step one, how we talked about finding “valuable” topics for your audience? When you start tracking the analytics of your content, you will start to see trends in what your audience is responding to and what platforms you are getting the most engagement on. Knowing this will help you hone in what is truly valuable to your audience.
The number one tool to help you figure this out is Google Analytics.
Google Analytics is a free tool from Google that tracks what people are doing on your website and so much more. Google Analytics will really tell you everything you would ever want to know when it comes to your content marketing efforts.
Setting up Google Analytics
To start, we want to make sure that your website is connected to your Google Analytics account.
To find out, go to this website, enter your domain name, and it will check for you. http://www.gachecker.com
If you already have an account then you should be able to login to Google Analytics.
If you do not have a Google Analytics account connected to your website, you can follow these steps to get started:
Go to Google Analytics, and follow the simple steps of creating a free account.
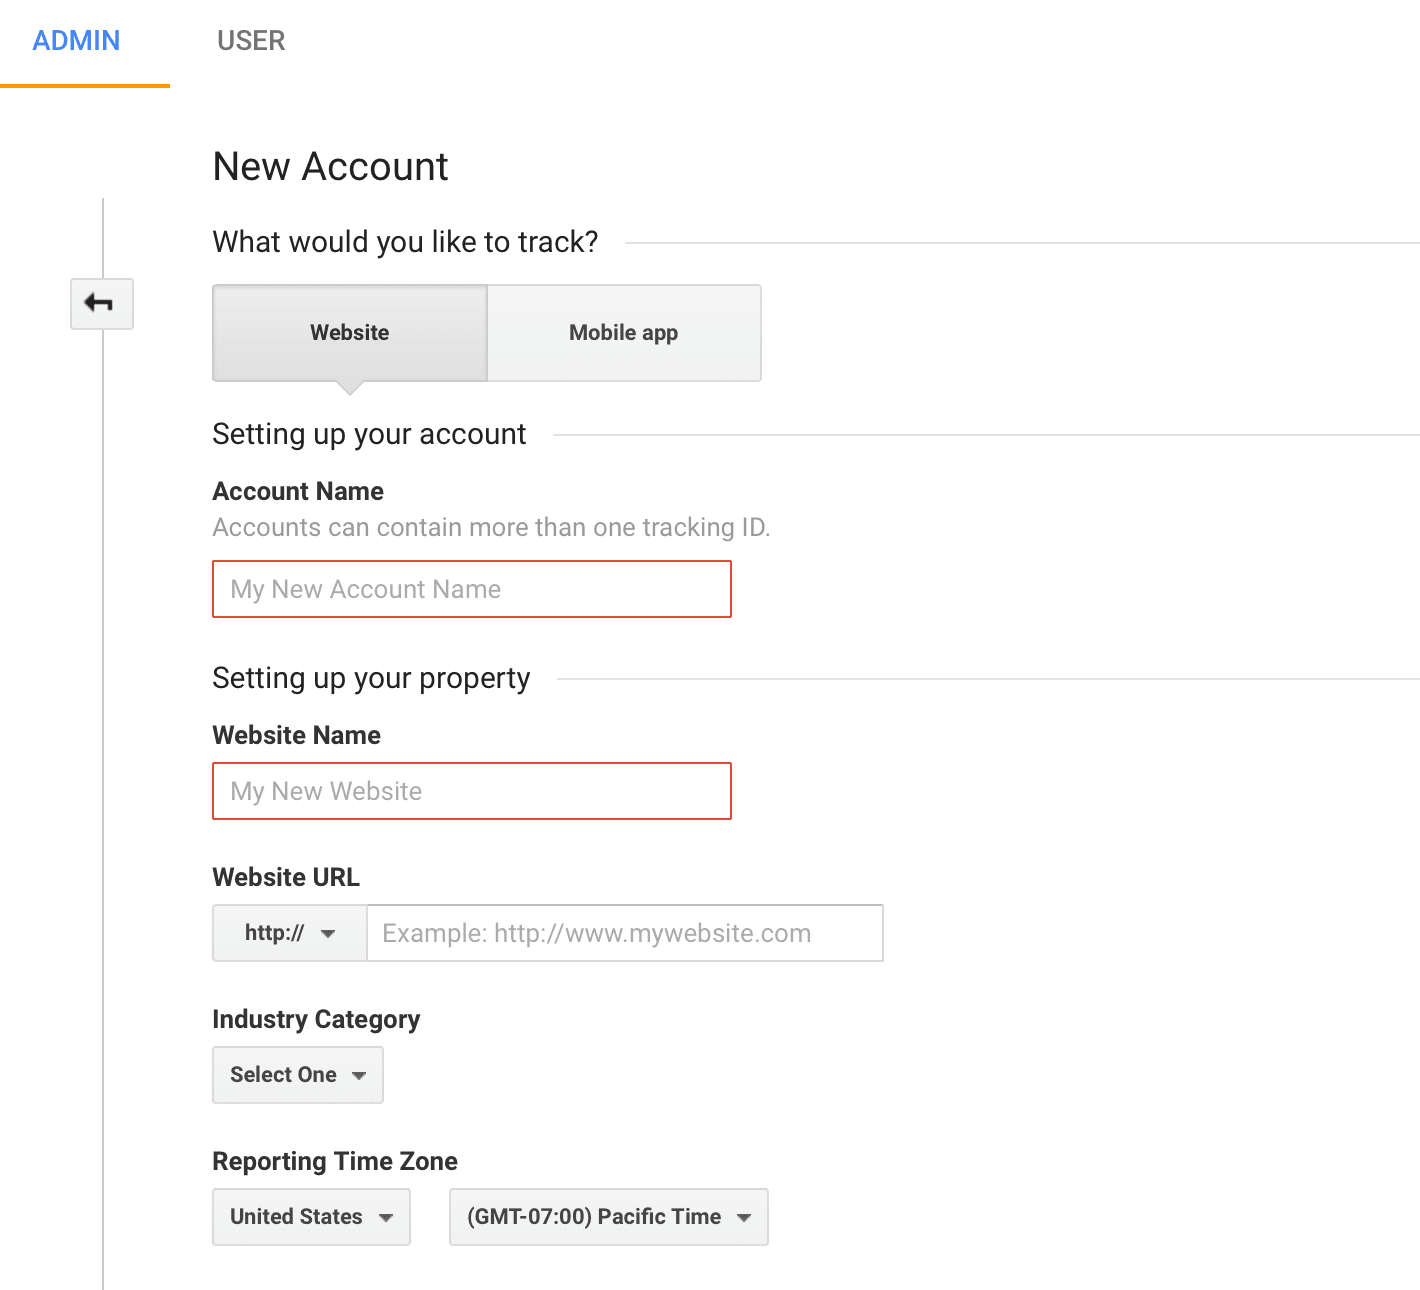
Then click the Get Tracking ID button.
This will give you a tracking code. This is the code that you will be using on your website to connect to Google Analytics.
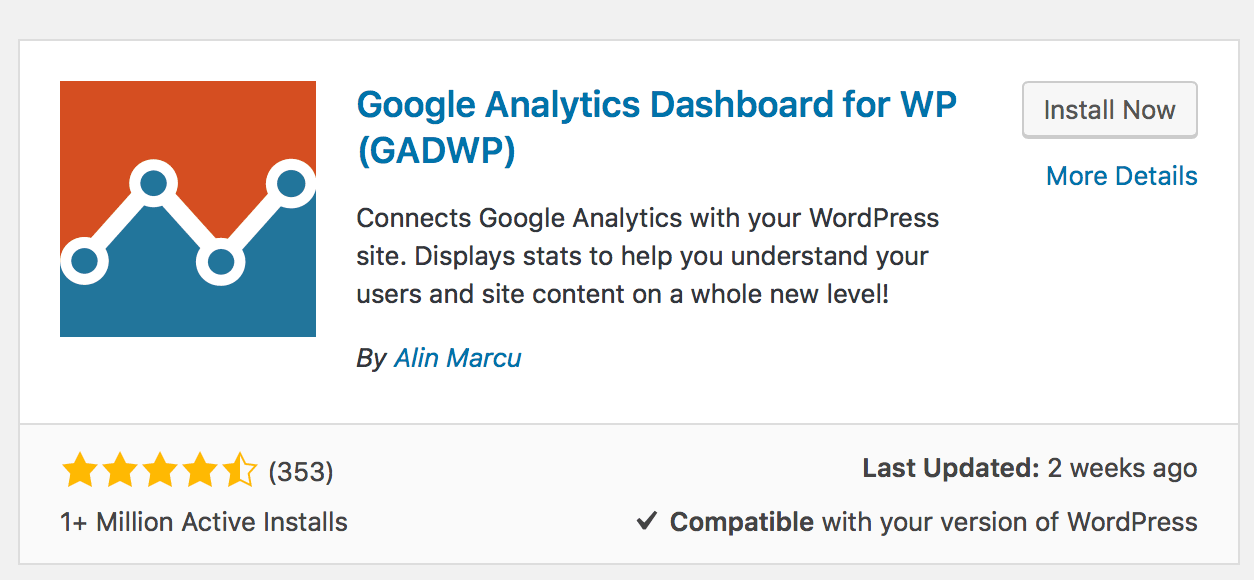
The next step is to install the Google Analytics plugin on your WordPress website. Using the plugin method is the easiest way to do this.
To install the plugin login to your WordPress website and go to Plugins > Add new. In the search field, search for Google Analytics Dashboard for WP.
Install and activate the plugin.
Once the plugin is activated, go to General Settings under the Google Analytics tab in the left admin navigation.
Next, you will need to authorize the plugin. Click Authorize Plugin.
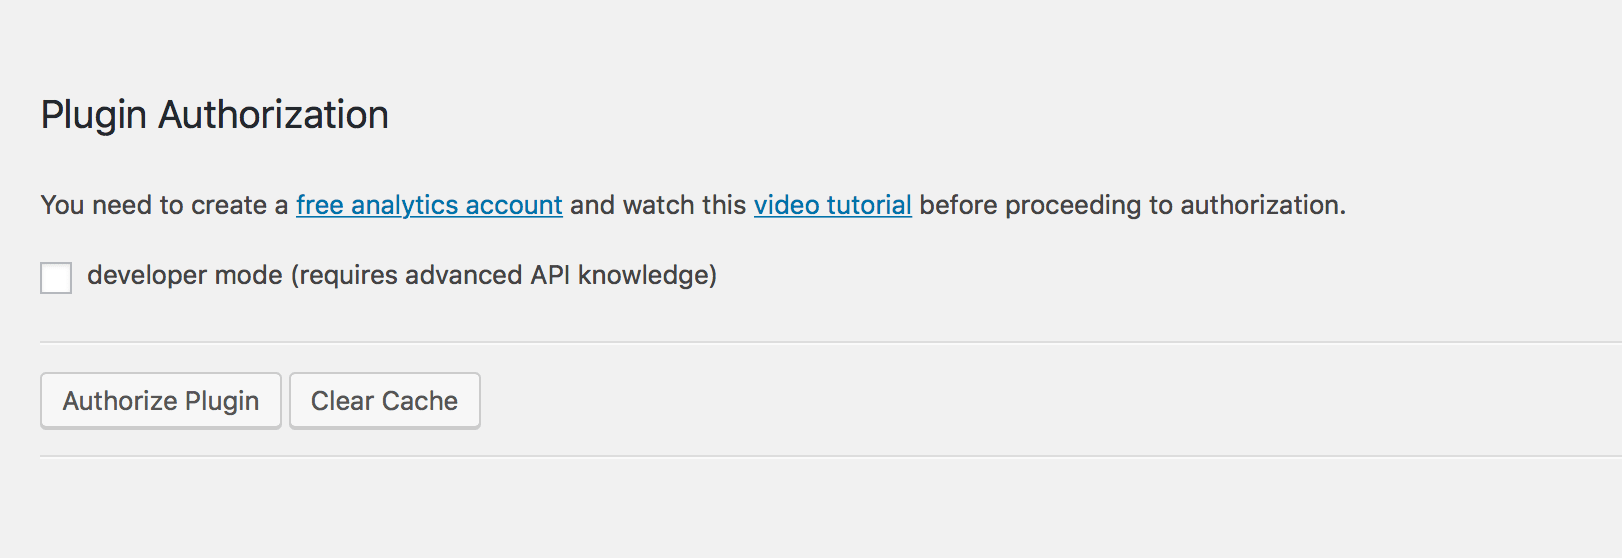
Then, click on Get Access Code in red. It will take you to a screen where you will sign in to your Google Analytics account and access will be granted.
Finally, click the Save Access Code button.
For more detailed instructions on installing and setting up this plugin, you can watch this video: https://www.youtube.com/watch?v=d4VIZ0XnA-c
Note that Google Analytics will not show you data prior to the date it was connected to your site… it will only start showing you data from the date it’s connected and on.
After you’ve had Google Analytics connected for a little bit you will want to go back and check things out to see what’s happening on your website.
We are going to cover three main areas of your Google Analytics account to get the data you need to see to start measuring your content marketing efforts.
- New visitors vs. returning
- Audience engagement
- The channels your traffic are coming from
- The social platforms your traffic is coming from
- What pages are getting the most views
- How long people are staying on your pages
- The Bounce Rate of your pages
So, let’s dive into to these areas and start exploring the data to see what we find!
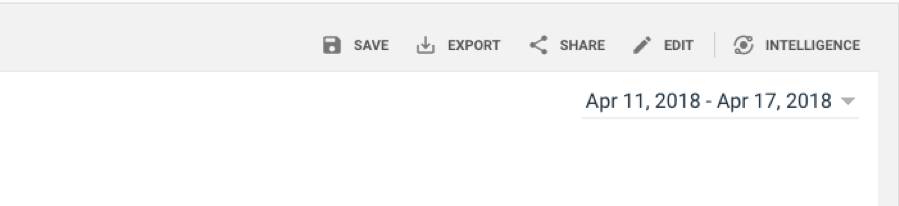
First, you’ll want to set a date range for the data that is getting pulled. By default, Google Analytics is going to pull the last 7 days. For our research, we are going to want to increase our date range so that we can see more data.
You’ll want to look at least the last 30 days of data, but if you have more data available, you can set it to the last 90 to 180 days to see an even bigger picture of what is going on.
To do this, click on the date drop-down in the upper right-hand corner of the screen.
Audience – New vs. Returning Visitors
Starting with Audience, let’s go to the New vs. Returning report.
Click on Audience, then Behavior, and New vs. Returning.
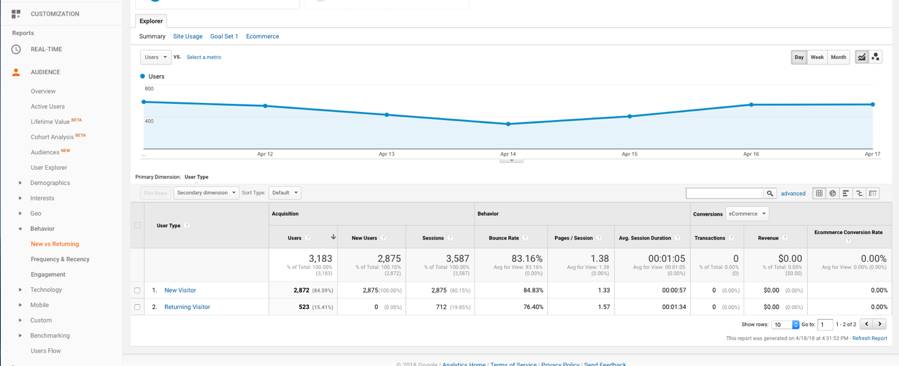
In the New vs Returning report, you are looking at how many visitors that came to your site, in your specified timeframe, were new visitors and how many were returning.
In most cases, your new visits will always exceed your return visits, and that is fine. What you want to pay attention to is what percentage of your visitors are coming back. In the image above you can see, on line 2, that 15% percent of the visitors are coming back. This is not bad, considering this example site is not producing a ton of new content. While there is no specific percentage number to obtain when it comes to returning visitors, you do want it to be as high as possible.
If this percentage is really low, then it might be an indicator that you need to start focusing on strategies to get people back to your site.
Here are a few tactics to increase your returning visitors:
- Newsletters – A great way to get people back to your site is to send out a newsletter to your subscribers. We like MailChimp as a newsletter service, it’s easy to use, and it’s free. Newsletters are a great place to tease your latest blog post or landing page with a link for more information.
- Social Media – When you write a new post or have a lead page to promote, keep repurposing it on your social media platforms.
Audience – Engagement
Now let’s look at the Engagement Report.
Click on Audience, then Behavior, and Engagement.
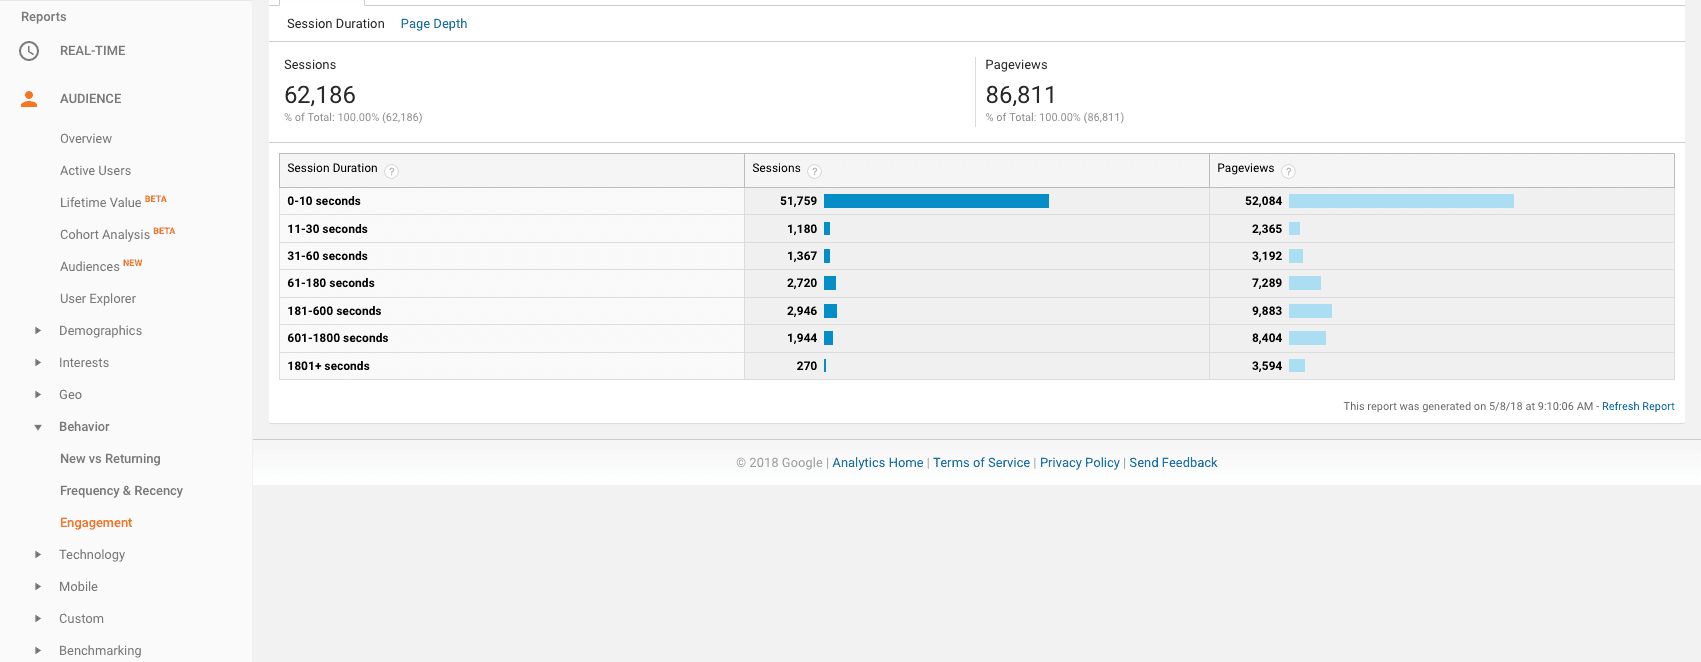
In the Engagement Report, you are looking at how much time visitors are staying on your site.
The first column in this report shows the duration of visits, and the second column shows how many sessions visited for that duration. The longer the better, so a larger number of sessions with a longer duration is very good.
You will always have the most sessions in the 0-10 seconds row, but that’s ok. We just want to make sure that there is a good amount of sessions in the longer durations as well. This means people are staying on your site.
Here are a few tactics to increase the duration of your visits:
- Include Videos: People love videos, adding a video to your post will help keep people on your page longer.
- Related Posts: Add related posts to the bottom of each post. This will encourage your visitors to read more of your content and keep them on your site longer.
Acquisition – All Traffic
In the Acquisition section, we are going to look at where your traffic is coming from. The two areas we are going to focus on is All Traffic and Social Traffic.
This is going to tell us where all of your traffic is coming from.
Click on Acquisition, then All Traffic, and Channels
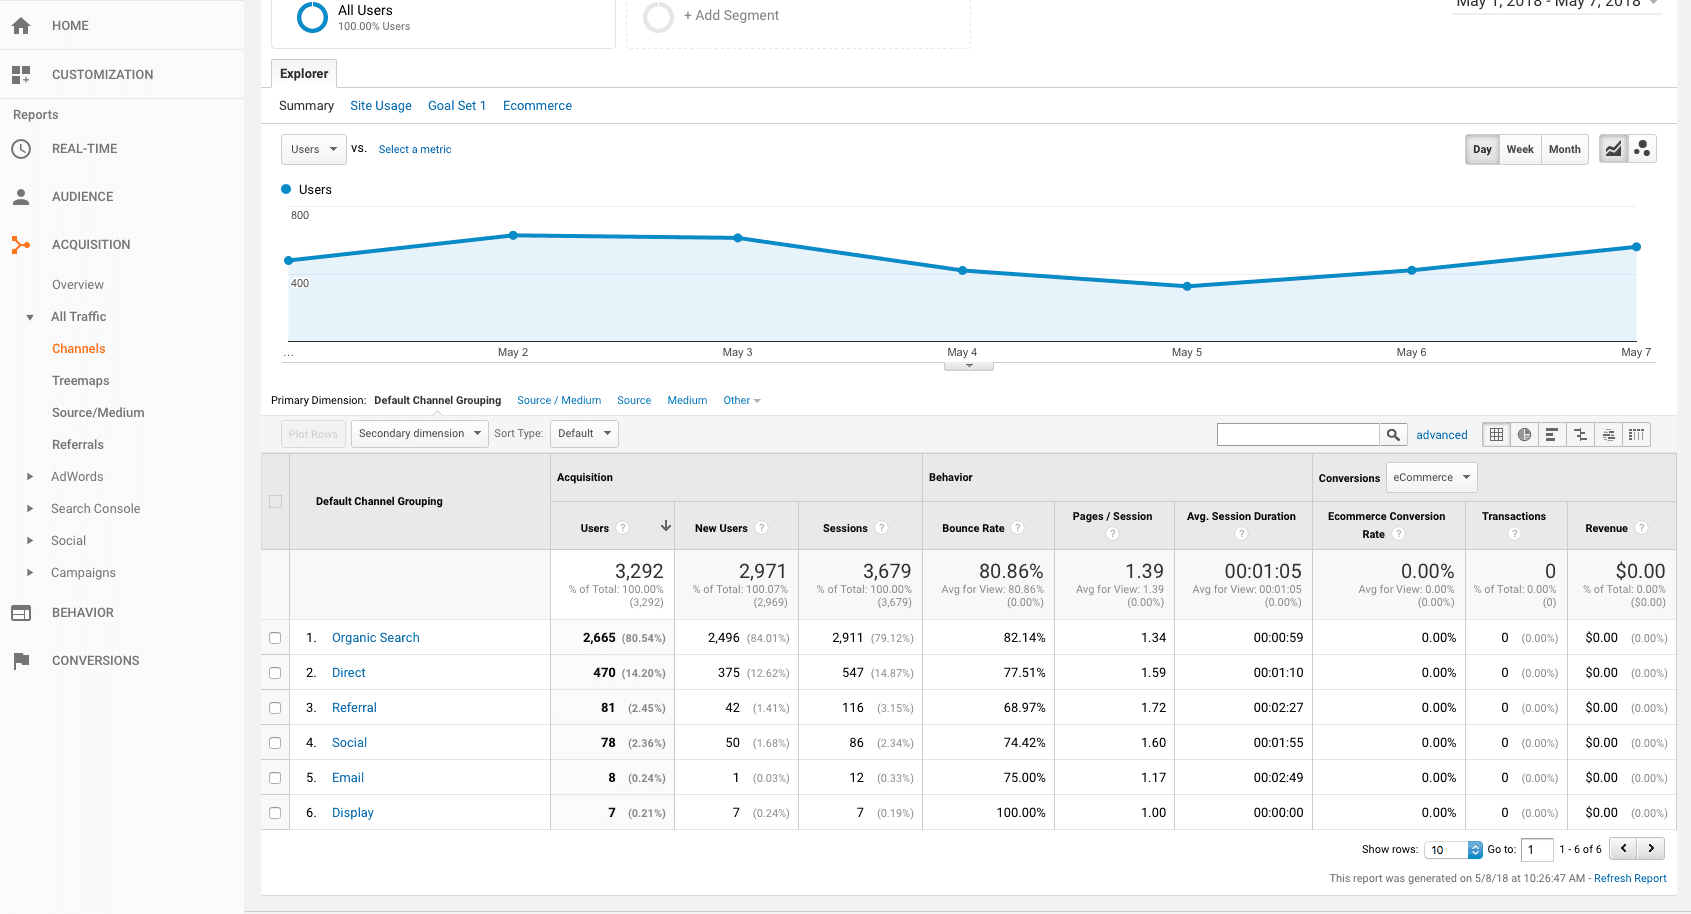
The Channels report is going to show you the source of where your traffic is coming from.
It breaks it down into the following categories:
- Organic Search– This traffic is from people searching for you on search engines like Google, Bing, etc.
- Direct– This traffic came to your site directly, meaning they put the website URL in the address bar of their browser to visit your website.
- Referral – This traffic came to your site by clicking on a link from another website.
- Social – This traffic came to your site through a social platform, such as Facebook, Twitter, LinkedIn, etc.
- Email– This traffic came to your site through an email or email newsletter.
- Paid/Display– This traffic came to your site through paid advertising such as Google AdWords, or Facebook ads.
Important factors to notice:
- Users– This is the number of people that visited your site for that channel.
- Bounce Rate– Bounce Rate is the number of people that visited your site and quickly left. The lower the bounce rate the better. You don’t want people to bounce.
- Pages/Sessions– This is how many pages people visited per session for that channel.
- Session Duration– This is the average length of time that people stayed on your site for that channel.
Looking at the different channels, you should be able to see which ones are performing well and which ones are not.
Acquisition – Social
Next, we are going to look at the traffic coming from Social in the Acquisition section. This is going to tell us where your social traffic is coming from.
Click on Acquisition, then Social, and Overview
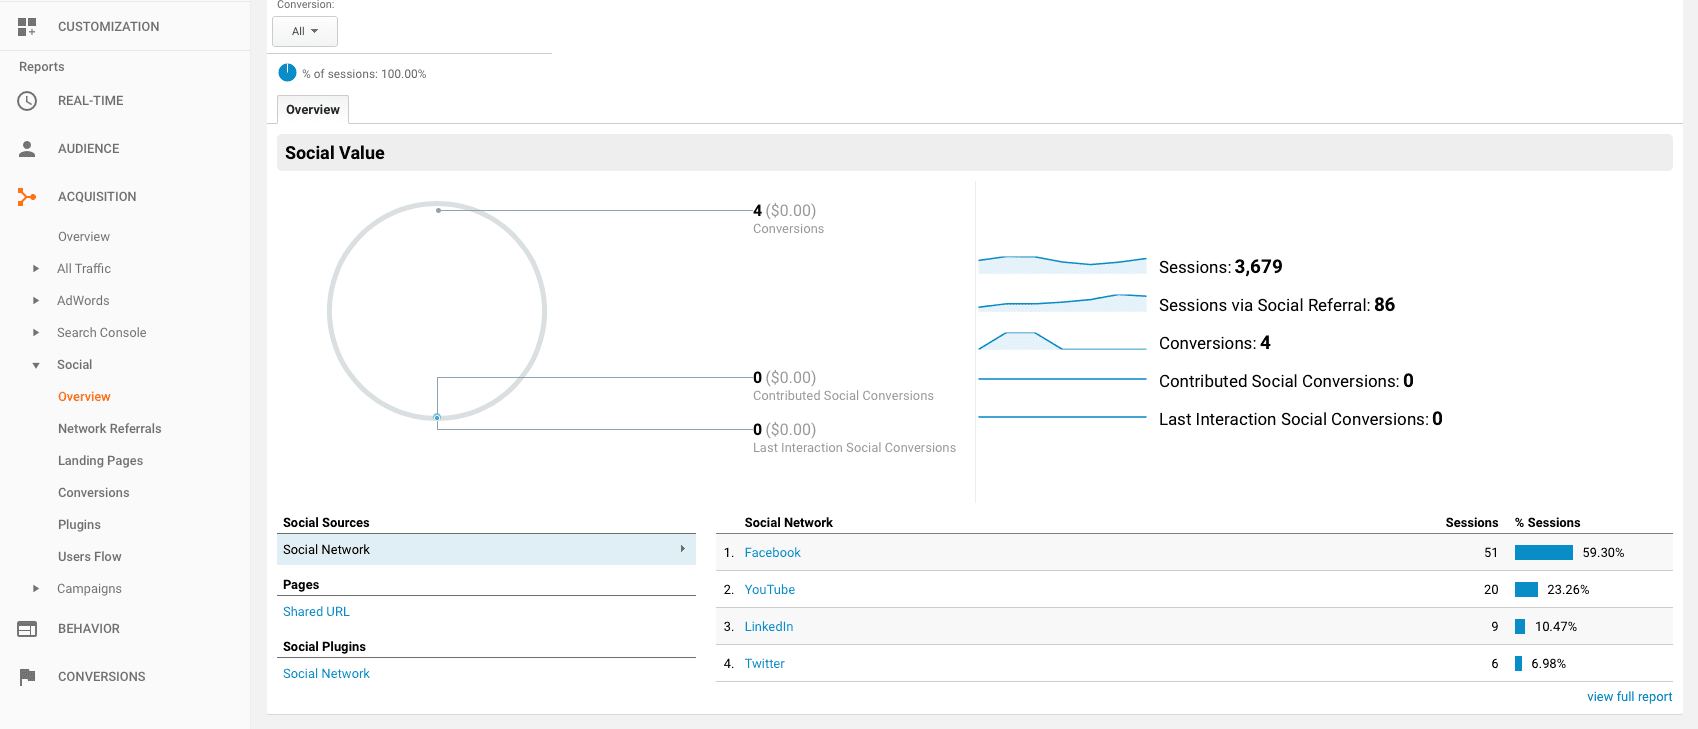
In the Social report, you are going to be able to see which social platforms are driving traffic to your website.
In the lower right portion of this report, you’ll see a list of social networks followed by a number of sessions. This is going to tell you where your content is resonating best with your audience.
Knowing this will be a good indicator of where to focus your attention. If you are getting good results on Facebook and so-so results on Twitter, then it would make sense to put more focus on Facebook and possibly try something different on Twitter.
Behavior – All Pages
In the Behavior section, we are going to see what people are doing on your site once they get there. In the All Pages report in the Behavior section we are going to see what pages are getting the most visits and how people are interacting on each page.
Click on Behavior, then Site Content, and All Pages
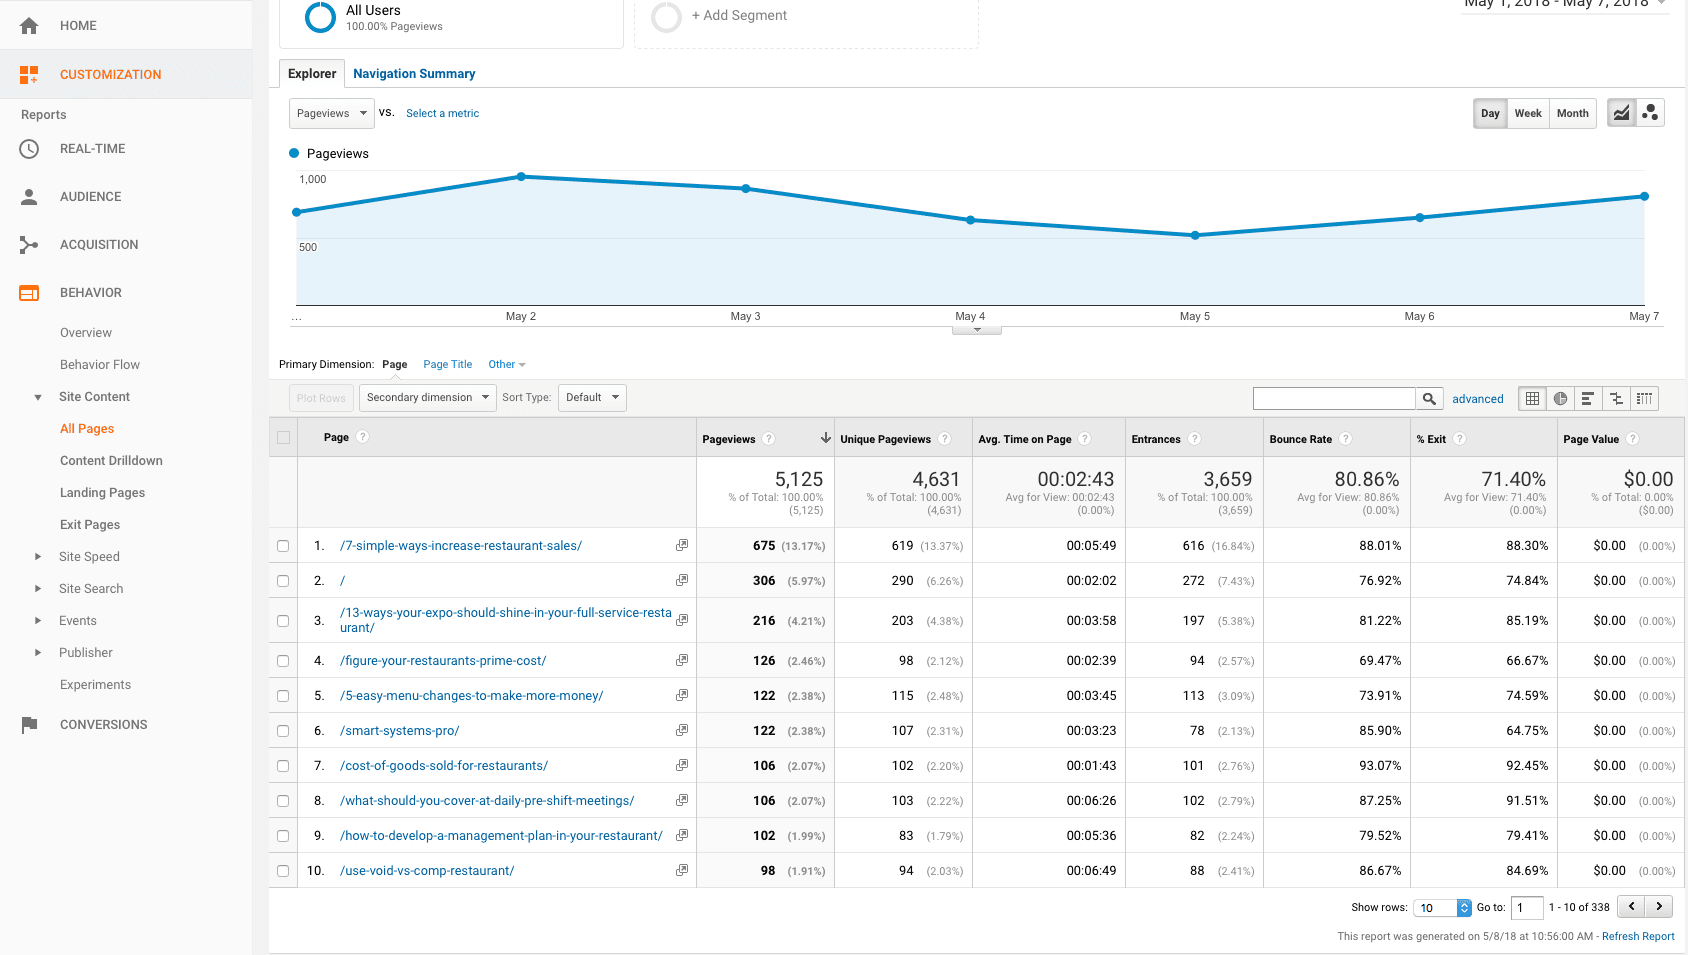
The All Pages report is going to show you what pages on your site are being visited. On the left side, you’ll see a list of the page URLs, sorted by most visited.
The most important factors we want to look at for each page are:
- Pageviews – This is the number of views that this page has.
- Time on Page – This is how long people stayed on that specific page.
- Bounce Rate – This is the number of people that visited this page and quickly left. Remember, the lower the bounce rate the better.
Looking at this report, you should be able to see what pages or content is driving the most website traffic and how engaged they are on each page.
Another cool way to see what people are doing on your pages is to use the Google Analytics Chrome extension. This tool will actually show you what people are clicking on within each of your pages. I made a quick video on how to set this up and use this extension. You can check it out here: https://youtu.be/qEpsIfIbGhE
Setting up Goals in Google Analytics
Inside of Google Analytics, you can set up goals to track certain actions you want people to take. The benefit of doing this is that you can easily track these conversions and see the who, where, and how your visitors are taking the actions you want them to take on your website. To help you out, I’ve also created a video tutorial to show you how to set this up: https://youtu.be/lz7LKWZW80c
When analyzing your analytics, there is no magic number of where your metrics should be. Remember the goal is to measure the success of your marketing actions and see if (and what) areas are improving the traffic to your website. Regularly measuring your analytics will give you a baseline and tell you if your marketing efforts are improving or not.
That completes our step-by-step guide to increasing traffic to your website.
I hope you found this information valuable!
Please feel free to reach out with any questions you may have as you navigate through this process.

